
Inside Professional Studio Design — Layout, Acoustics, and Workflow Explained
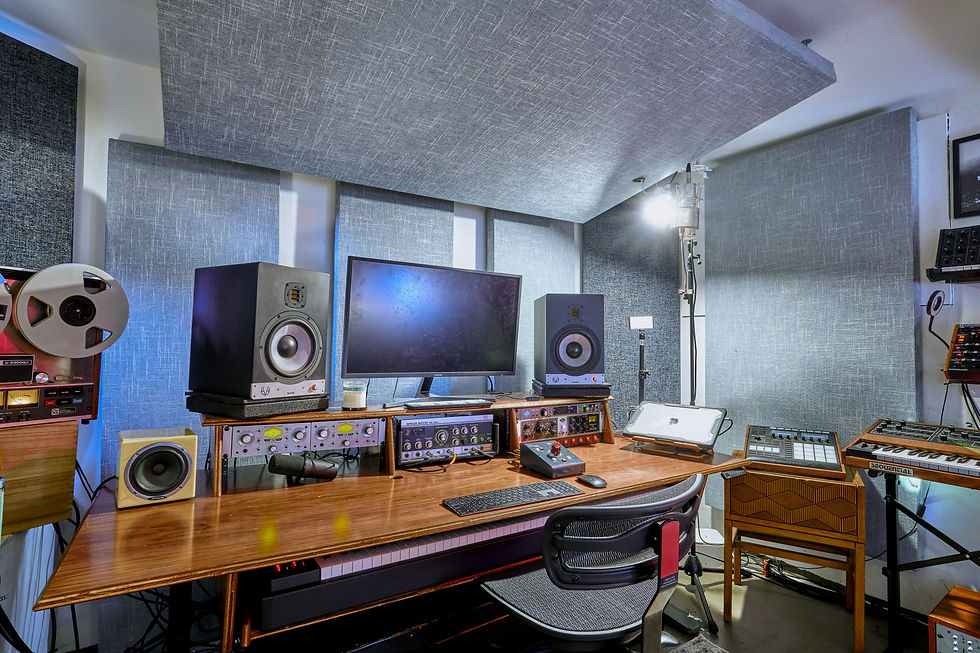
A professional studio is not simply a room filled with expensive equipment.
Its performance depends on how the space is planned, how sound behaves within it, and how easily artists and engineers can move through the production process. The layout, acoustic treatment, isolation, speaker position, sightlines, equipment access, and even door placement can affect the quality and speed of the work.
This is what separates professional studio design from simply placing gear in an available room.
A well-designed studio brings acoustics, layout, technology, and workflow together. Each area has a clear purpose, and every design decision supports the people using the space.
What Is Professional Studio Design?
Professional studio design is the process of creating an audio production space around its intended use.
That space may be designed for:
Recording music
Mixing and mastering
Songwriting and production
Film and television post-production
Voiceover and podcast recording
Game audio
Content creation
Critical listening
Client playback and review
Professional studio design considers more than appearance. It looks at how the room should sound, how people will work inside it, what equipment will be used, and how the space may need to adapt over time.
The goal is to create a studio where sound decisions are accurate, recording conditions are controlled, and the workflow feels natural.
The Main Areas of a Professional Studio
Larger professional studios are often divided into several acoustic and functional zones. Each area serves a different role in the production process.
The exact configuration depends on the type and scale of the facility, but common spaces include the following.
The Control Room
The control room is where recording, editing, mixing, and playback decisions are made.
It usually contains:
Studio monitors
A mixing console or workstation
Audio interfaces and converters
Outboard equipment
Computer displays
Patchbays
Monitoring control
Seating for engineers, producers, artists, and clients
The acoustic priority in a control room is accuracy. The engineer needs to hear what is actually in the recording without excessive coloration from the room.
Professional control room design therefore focuses on symmetry, speaker placement, reflection control, low-frequency management, and a stable listening position.
The Tracking Room
The tracking room is where musicians, vocalists, and instruments are recorded.
Unlike a control room, a tracking room is not always designed to be acoustically neutral. It may be intentionally lively, controlled, dry, or variable depending on the type of work being recorded.
A tracking room should provide enough space for performers and instruments while controlling unwanted reflections, resonance, and noise.
Larger rooms may support drums, ensembles, amplifiers, and multiple musicians at once. Smaller tracking rooms may be optimized for vocals, guitars, strings, or other focused recording tasks.
Isolation Booths
Isolation booths allow individual performers or sound sources to be recorded separately from the main tracking room.
They are often used for:
Vocals
Guitar amplifiers
Brass instruments
Voiceover
Loud instruments
Additional musicians during live sessions
An isolation booth needs careful acoustic planning. A booth that is too small or overly absorptive can sound boxy, unnatural, or uncomfortable.
The goal is controlled separation without creating a space that makes every source sound the same.
Machine and Equipment Rooms
Servers, computers, amplifiers, power supplies, and other equipment may generate heat and noise.
Moving noisy equipment into a separate machine room can help keep the control room quiet. This is particularly important in recording and post-production environments where low background noise is essential.
The machine room must still provide ventilation, cooling, cable access, and maintenance clearance.
Client and Support Areas
Professional studios may also include lounges, kitchens, storage areas, writing rooms, technical spaces, and client review rooms.
These spaces may not be acoustically critical, but their location affects the overall studio workflow. A lounge placed beside a vocal booth, for example, can create unnecessary noise problems.
Professional studio design looks at the entire facility rather than treating each room as an isolated space.
Acoustic Zoning: Why Different Rooms Need Different Treatment
One of the most important principles in professional studio design is acoustic zoning.
Acoustic zoning means designing each space according to its specific function. A mixing room, tracking room, vocal booth, hallway, and client lounge do not need to sound the same.
Control-room acoustics
A control room should provide a reliable listening environment.
The design usually aims to control:
Early reflections
Low-frequency buildup
Speaker-boundary interaction
Stereo imaging
Reverberation time
Differences between the left and right sides
Reflections from desks and equipment
The room should allow the engineer to judge balance, tone, dynamics, depth, and stereo placement accurately.
Tracking-room acoustics
A tracking room may need more acoustic character.
Some rooms are designed with a controlled, balanced decay that works across several instruments. Others include reflective and absorptive zones so engineers can select different positions based on the sound they want.
A drum kit may benefit from a more open area, while a vocal performance may require a drier position.
This flexibility allows the room itself to become part of the recording process.
Isolation-booth acoustics
Isolation booths require a balance between control and natural sound.
Too many hard surfaces can create boxy reflections. Too much thin absorption can remove the high frequencies while leaving low-mid resonance untreated.
Treatment needs to work across a useful frequency range, particularly in small rooms where acoustic problems are more concentrated.
Layout Begins With the Production Process
A professional studio layout should be developed around how a session actually works.
Before walls are built or equipment is installed, designers need to understand:
Who will use the studio
What will be recorded
How many people will work at once
What equipment will move between rooms
Where instruments will be stored
How clients will enter and move through the space
How engineers communicate with performers
Whether video or live-streaming is required
How the facility may grow
The answers shape the entire plan.
A studio designed mainly for solo production will look different from a commercial recording facility. A post-production room will have different needs from a live tracking studio. A podcast facility may prioritize fast room turnover and consistent speech recording.
Professional studio design starts with these practical requirements.
Designing the Control Room Layout
The control room is usually the most technically sensitive part of the studio.
Symmetry around the listening position
The left and right sides of the room should behave as similarly as possible.
If one monitor is beside a solid wall and the other is beside a doorway or window, the stereo image may become uneven. The engineer may hear one side differently from the other and compensate incorrectly.
For this reason, the desk, speakers, treatment, and listening position are typically arranged around a central axis.
Speaker and listener placement
The speakers and primary listening position should be planned before the furniture is finalized.
The monitors usually form an equilateral triangle with the engineer. The tweeters should be near ear level, and the speakers should be angled toward the listening position.
Their distance from walls and corners affects bass response, so placement should be tested rather than based only on appearance.
Desk design
A large desk may look professional, but it can create strong reflections between the monitors and listener.
The desk should provide enough space for essential equipment without becoming a major acoustic obstacle. Its height, depth, shape, and surface materials all matter.
In many modern studios, smaller work surfaces and carefully integrated equipment racks help reduce reflections and keep the listening area clear.
Seating and client position
Additional seating should not interfere with the primary listening position or block treatment.
The engineer’s position remains the priority, but clients and collaborators should still be able to listen comfortably and communicate without disrupting the workflow.
Designing the Tracking Room Layout
The tracking-room layout should support both sound and movement.
Space around performers
Musicians need enough room to play comfortably, communicate, and move equipment safely.
Drum kits, amplifiers, microphone stands, music stands, and cables can quickly fill a room. The layout should anticipate these needs rather than forcing every session to work around limited access.
Flexible recording positions
A professional tracking room often provides several usable acoustic areas.
One part of the room may sound more reflective and open. Another may be drier and more controlled. Portable gobos or movable acoustic panels can create additional separation and flexibility.
This allows engineers to shape the recording before relying on processing.
Clear sightlines
Artists and engineers often need visual communication during a session.
Windows between the control and tracking rooms should provide useful sightlines without creating unnecessary acoustic problems. Camera systems may also be used where direct visibility is limited.
Good sightlines reduce interruptions and help performers feel connected to the session.
Workflow Paths: How People and Equipment Move
Workflow is one of the least visible but most important parts of professional studio design.
A studio can sound excellent and still be frustrating if people, instruments, and equipment cannot move easily.
Artist workflow
Artists should be able to enter, prepare, perform, and take breaks without repeatedly crossing technical areas.
A practical path might move from the entrance to a lounge or preparation area, then into the tracking space. Storage for cases, instruments, and personal items should be nearby but outside critical recording zones.
Engineer workflow
Engineers need quick access to the control room, tracking room, patching, microphones, cables, and technical equipment.
Repeatedly walking long distances or moving through unrelated spaces slows sessions down.
Equipment workflow
Large equipment needs wider pathways and suitable door openings.
Pianos, amplifiers, drum kits, racks, and cases should be able to move into the studio without damaging walls or interrupting other spaces.
Storage should be placed close enough to the tracking room to reduce setup time.
Cable workflow
Audio, power, network, video, and communication cabling should be planned before construction.
Proper cable pathways reduce clutter and make future maintenance easier. Wall panels, floor boxes, conduit, patchbays, and equipment racks should all connect logically.
Poorly planned cable routes can lead to noise, trip hazards, difficult repairs, and expensive changes later.
Sound Isolation Between Studio Zones
Acoustic treatment improves sound within a room. Sound isolation controls sound transfer between rooms.
Professional studios often need both.
The control room should not be disturbed by sound from the tracking room, hallways, HVAC equipment, or nearby businesses. At the same time, the tracking room may need to contain drums, amplifiers, and other loud sources.
Isolation may involve:
Decoupled wall and ceiling assemblies
Additional mass
Air gaps
Floating or isolated floors
Acoustic doors
Specialized studio windows
Airtight seals
Isolated ventilation
Carefully planned cable penetrations
Doors, windows, vents, and gaps are especially important because sound will travel through the weakest part of the construction.
Isolation should be designed as a complete system. Improving one wall has limited value if sound can easily pass through the door or ventilation system.
HVAC and Background Noise
Ventilation is essential, but it can also become one of the loudest parts of a studio.
Air-conditioning systems may introduce fan noise, vibration, airflow noise, or sound transmission between rooms. Turning the system off during every recording session is rarely practical.
Professional studio design includes quiet HVAC planning from the beginning.
This may require:
Low-velocity airflow
Larger ducts
Acoustic duct lining
Silencers or attenuators
Vibration isolation
Separate zones
Remote mechanical equipment
Carefully positioned supply and return vents
The system must keep the studio comfortable without raising the noise floor or affecting recordings.
Lighting, Comfort, and Creative Focus
A professional studio needs to work acoustically, but it also needs to support long sessions.
Lighting should be comfortable, adjustable, and positioned to avoid screen glare. Temperature and ventilation should remain stable. Seating should support extended work without forcing the listener out of the correct position.
Visual design also affects the experience of the studio.
Materials, colors, lighting, and architectural details can create a sense of identity and help artists feel comfortable. However, visual choices should not create acoustic problems through excessive glass, hard parallel surfaces, or poorly placed decorative features.
The strongest studios integrate visual and acoustic design from the start.
Why Workflow Affects Sound Quality
Workflow may seem separate from acoustics, but the two are closely connected.
When equipment is easy to access, microphone changes happen faster. When performers can communicate clearly, fewer takes are lost. When cables and patching are organized, technical problems are easier to identify. When the room is comfortable, people can work longer without fatigue.
A smooth workflow also allows the engineer to focus more fully on listening.
Every interruption, difficult setup, or awkward movement pulls attention away from the recording. Professional studio design reduces these points of friction.
The result is not only a more efficient facility. It is often better creative work.
The Role of Acoustic Treatment in Professional Studios
Acoustic treatment controls reflections, resonance, and decay inside each room.
Common treatment elements include:
Broadband absorbers
These reduce reflections across a wide frequency range and are commonly used at first reflection points, on ceilings, and on rear walls.
Bass traps
Bass traps help control low-frequency buildup in corners and along room boundaries.
Diffusers
Diffusers scatter sound energy to preserve a sense of space without creating strong direct reflections.
Ceiling clouds
Ceiling treatment controls vertical reflections above listening and recording positions.
Movable acoustic panels
Portable panels and gobos allow tracking rooms to adapt to different performers and instruments.
Treatment should never be selected based only on empty wall space. It should address the measured and expected behavior of the room.
Measurement, Tuning, and Calibration
Professional studio design does not end when construction is complete.
The finished rooms should be measured and evaluated. This allows the design team to identify frequency-response problems, reflections, decay behavior, and differences between speakers.
Adjustments may include:
Moving the monitors
Refining the listening position
Adding or relocating treatment
Adjusting crossover or subwoofer settings
Balancing speaker levels
Applying room calibration
Reducing mechanical noise
Calibration works best after the physical room, treatment, and speaker placement have been optimized.
Software correction can refine a good room, but it cannot replace appropriate design or fix isolation and reflection problems.
Common Professional Studio Design Mistakes
Designing around gear instead of work
A studio can become crowded with equipment that does not support the primary workflow. Start with the production process, then select the tools and layout that serve it.
Making every room acoustically dead
Different rooms need different acoustic behavior. A tracking room, vocal booth, and control room should not all have the same treatment strategy.
Ignoring storage
Poor storage leads to cases, instruments, stands, and cables filling critical work areas.
Underestimating isolation
Sound transfer problems are difficult and expensive to correct after construction.
Treating HVAC as an afterthought
A quiet room is of little use if the ventilation system introduces constant noise.
Prioritizing appearance over performance
A visually impressive studio can still be unreliable if the speakers, listening position, and treatment are poorly planned.
Building for only one workflow
Studios evolve. Flexible routing, adaptable treatment, and thoughtful equipment access can make the space useful for longer.
What Makes a Studio Feel Professional?
A professional studio does not feel professional only because of its equipment or finishes.
It feels professional because the space supports the work.
The monitoring is reliable. Recordings are controlled. Communication is easy. Equipment is accessible. Background noise is low. The room is comfortable. Artists can focus on performing, and engineers can focus on listening.
That experience comes from many design decisions working together.
Frequently Asked Questions About Professional Studio Design
What is the difference between a control room and a tracking room?
A control room is designed for accurate monitoring, recording control, editing, and mixing. A tracking room is designed for capturing performers and instruments. The control room usually prioritizes neutrality, while the tracking room may have a more flexible or intentional acoustic character.
Does every professional studio need separate rooms?
No. Smaller production studios may combine recording and mixing in one well-planned space. The ideal layout depends on the work, available space, required isolation, and number of users.
Why is studio workflow important?
Workflow affects how quickly people can set up, record, communicate, troubleshoot, and move equipment. A good workflow reduces interruptions and allows artists and engineers to stay focused on the creative process.
Can acoustic panels alone create a professional studio?
No. Acoustic panels are one part of professional studio design. Room proportions, layout, speaker placement, isolation, HVAC, wiring, workflow, and calibration also affect performance.
When should an acoustic designer be involved?
Ideally, acoustic planning should begin before construction or renovation. Early involvement makes it easier to address room proportions, isolation, door and window placement, HVAC, wiring, and treatment integration.
Final Thoughts
Professional studio design is the process of turning a collection of rooms, equipment, and technical requirements into one functional production environment.
The control room, tracking room, isolation spaces, equipment areas, and support zones must each serve a clear purpose. Their acoustics should match the work performed inside them, and the paths between them should make sessions easier rather than more complicated.
When layout, acoustics, isolation, technology, and workflow are designed together, the studio becomes more than a place to record. It becomes a system that supports better listening, faster decisions, smoother sessions, and higher-quality creative work.
That is the real purpose of professional studio design: to create a space where sound and workflow support each other from the first setup to the final playback.


Comments